How to Set Up Borg Backups from the Command Line on Linux and macOS
Reviewed in August 2023
- Introduction
- Prerequisites
- Step 1 - Install Borg
- Step 2 – Install Python 3 and Borgmatic (optional)
- Step 3 – Create and Assign SSH Key for Authentication
- Step 4 – Connect to Remote Borg Repository
- Step 5 – Initialize Borg Repository
- Step 6 – Set up Borgmatic for Regular Backups
- Step 7 – Put your Backups on Auto-Pilot
- Conclusion
- Have any other questions? Email Us!
You should be comfortable using the command line. If you prefer a graphical, client, look into our Vorta Desktop Client instead. These instructions should work on macOS and popular Linux flavors, like Debian, Ubuntu, as well as Red Hat, Fedora and CentOS.
Borg will get a major upgrade to version 2 later this year, which brings many improvements and removes legacy code- and features. Most commands stay the same. Where there is a difference, you can choose the right version using the tabs above the code snippet. BorgBase itself supports all the latest release of every major branch and you can choose the preferred version for each repository.
Introduction
In this article we will set up a backup software called Borg Backup (or Borg for short). There are other backup solutions for Linux or macOS, but Borg has all the features we would expect from a proper backup, like encryption, compression and deduplication.
Prerequisites
This tutorial assumes you are using a recent Linux, *BSD or macOS machine. You don’t need to be a command line expert. All commands can be copy & pasted.
It also assumes that you have server-based version of Borg available. The easiest option is to sign up for BorgBase.com, which offers a free tier of 10 GB. Other options are your own server with SSH access or one of the providers linked here.
Step 1 - Install Borg
In this step we will install Borg Backup and later a helper-tool to manage configuration files. There are many ways to install Borg. Here just the most common ones. For more details, just look at the Borg installation guide.
If you use Docker or a similar container tool, you can also use this Borgmatic Docker image.
Install via PIP
If you already keep some Python tools around, you can just add Borg to it:
$ pip install borgbackup
Install as Pre-Compiled Binary
If you don’t manage a set of Python tools, the simplest way to install Borg is to download the latest release from their Github page. This binary will have everything you need in one file.
First we move to the Downloads folder, where we downloaded Borg to.
$ cd ~/Downloads
Then give execute permissions to Borg.
$ chmod +x borg-macosx64
Last, move it to a standard folder for applications. Depending on your setup you may need to enter your admin-password to write to this folder.
$ sudo mv borg-macosx64 /usr/local/bin/borg
That’s it. You now have Borg installed on your local machine. You can test it by simply starting it and checking the version
$ borg --version
This should print something like borg 1.2.2.
Step 2 – Install Python 3 and Borgmatic (optional)
After completing step 1, you are ready to use Borg for simple operations. If you want to schedule regular backup jobs and exclusions, it’s a good idea to install a helper tool – Borgmatic – as well. This time Python is required and there is no pre-compiled binary.
First make sure, you have a recent version of Python installed. On macOS, use Homebrew:
$ brew install python3
On Linux, use the system’s package manager, like Apt:
$ apt install python3
With Python working, you can install Borgmatic. For system-wide backups, you should install it as global system package.
$ sudo pip3 install borgmatic
If you plan on only backing up your home folder, installing it as user-package will work too:
$ pip3 install --user borgmatic
There are many other considerations in installing Python packages. If you get an error, make sure you know which Python installation you are using and what permissions are needed.
Step 3 – Create and Assign SSH Key for Authentication
In this step we will securely connect your machine to the remote repository using a SSH key. If you manage your own server or have already set SSH up, you can skip this step.
Let’s start by generating a public-private key pair based on the (currently) most secure Ed25519 standard.
$ ssh-keygen -o -a 100 -t ed25519
This will ask you for a location to save the key and a password. If you want to use automatic backups on your Mac, you should enter an empty passphrase or add the passphrase to the Keychain.
The above command will create a public- and a private key. The private key should remain a secret on your local machine. The public key is passed to your remote/cloud backup repository. You can display the public key using this command:
$ cat ~/.ssh/id_ed25519.pub
This will display your public key as single line. Now just copy it and provide it to your repository provider. When using BorgBase.com, you can add public keys under Account > SSH Keys.
Step 4 – Connect to Remote Borg Repository
Borg is currently transitioning to the more standards-conform ssh:// URL format. You may still see the older, deprecated SCP-style format (xxx@xxx.repo.borgbase.com:repo) in some places. The BorgBase control panel will give you the new format by default.
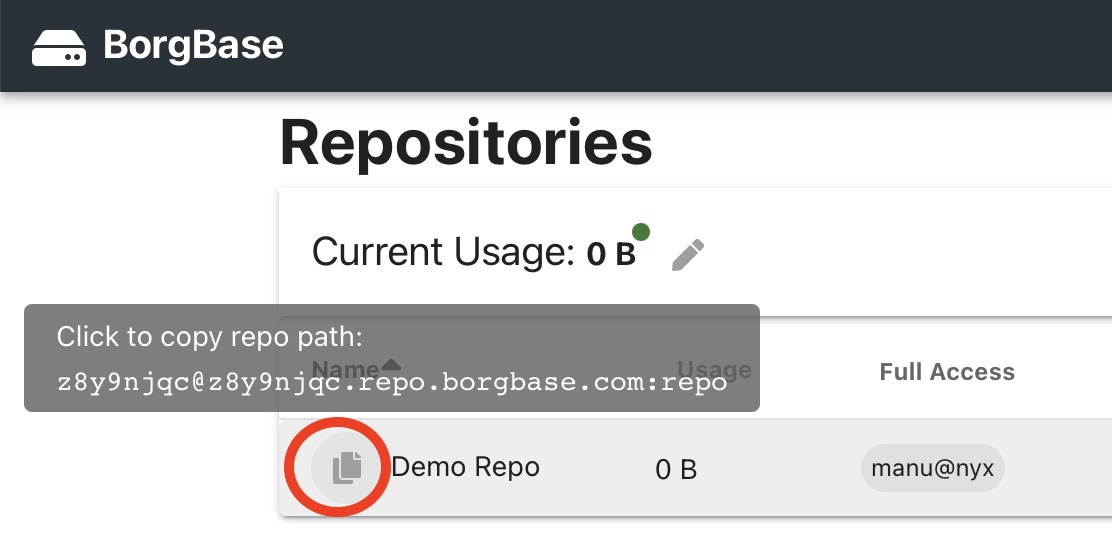
After adding your public key, you are ready to set up a remote repository. Different providers have different ways for this. When using BorgBase, add a new repository under Repositories. It will ask for a repo name, quota and which SSH key to use. You can also choose between US and EU server locations.
After adding the repo, you can copy the repository location using the icon in the first Name column.
This will tell Borg where to connect to for storing backups and it will use your public SSH key to authenticate itself. There are no passwords to remember and it’s very difficult to crack a key due to its length.
Step 5 – Initialize Borg Repository
Now that we have a secure connection to our repository, we can start using it. The first step is to initialize it. This involves setting an encryption mode and password.
Borg supports different encryption modes with the recommended one depending on the version. repokey means that the encryption key is protected by a password and stored in the remote backup repo. There is also keyfile mode which stores the keyfile in your home-folder. It’s important to know that both the keyfile and the password are required to access a repo. So if you lose your laptop with the keyfile on it, you can’t access the backup. That’s why it’s important to either use repokey mode or keep a copy of the keyfile somewhere else.
To initialize the remote repo, use the commands below. Replace the ssh:// URL with your actual full repository address given in the control panel. The repository URL will be kept as BORG_REPO variable to avoid typing it each time.
-
$ export BORG_REPO=ssh://... $ borg init -e repokey-blake2 -
$ export BORG_REPO=ssh://... $ borg benchmark cpu # optional: find fastest encryption algorithm $ borg rcreate --encryption=repokey-blake2-aes-ocbNote: Encryption speed can vary depending on CPU and if a virtual machine is used. So it’s best to benchmark it and choose the fastest combination. More here.
All those commands will ask you for a passphrase to protect the repository key. Make it nice and long and keep it somewhere safe.
After the command is done, you have your remote backup repository set up and ready to accept files. You can add some test files from your Documents folder with this commands:
-
$ borg create ::my-archive-1 ~/Documents -
$ borg create my-archive-1 ~/Documents
my-archive-1 is the name of the snapshot. It can be anything, but mostly people use the hostname and a timestamp. E.g. tim-macbook-2018-10-10. Archives allow you to access different versions of your files. This can be useful if a file was deleted by accident or encrypted by a cryptolocker.
Step 6 – Set up Borgmatic for Regular Backups
It would be quite cumbersome to manually run Borg every few hours and keep coming up with new Snapshot names. That’s why we will use Borgmatic to do this job for us.
Let’s start by creating a default Borgmatic folder:
$ mkdir -p ~/.config/borgmatic
Then open the main config file with your favorite text editor. I’ll use nano, but vi, Sublime or Atom will work too.
$ nano ~/.config/borgmatic/config.yaml
If you keep your repos with BorgBase you can copy a pre-made Borgmatic confirguration from the Setup page. Or start with this version and fill in the blanks:
-
# ~/.config/borgmatic/config.yaml source_directories: - ~/Desktop - ~/Documents - ~/Pictures # one_file_system: true repositories: - path: ssh://mmvz9gp4@mmvz9gp4.repo.borgbase.com/./repo exclude_caches: true compression: auto,zstd encryption_passphrase: CHANGE ME!! archive_name_format: "{hostname}-{now}" # Number of times to retry a failing backup # Needs recent Borgmatic version retries: 5 retry_wait: 5 keep_daily: 3 keep_weekly: 4 keep_monthly: 12 checks: - name: disabled # Uncomment to regularly read all repo data # Needs recent Borgmatic version # checks: # - name: repository # frequency: 4 weeks # - name: archives # frequency: 8 weeks check_last: 3 -
# ~/.config/borgmatic/config.yaml
location:
  source_directories:
    - ~/Desktop
    - ~/Documents
    - ~/Pictures

  # one_file_system: true

  repositories:
    - ssh://mmvz9gp4@mmvz9gp4.repo.borgbase.com/./repo

  exclude_caches: true

storage:
  compression: auto,zstd
  encryption_passphrase: CHANGE ME!!
  archive_name_format: "{hostname}-{now}"

  # Number of times to retry a failing backup
  # Needs recent Borgmatic version
  retries: 5
  retry_wait: 5

retention:
  keep_daily: 3
  keep_weekly: 4
  keep_monthly: 12

consistency:
  checks:
    - disabled
    # Uncomment to regularly read all repo data
    # Needs recent Borgmatic version
    # - name: repository
    #   frequency: 4 weeks
    # - name: archives
    #   frequency: 8 weeks

  check_last: 3
The configuration format for Borgmatic has changed in versions 1.8 and later. Make sure to use the appropriate configuration block based on your Borgmatic version. You can learn more about the changes in the changelog.
Note: Encryption speed can vary depending on CPU and if a virtual machine is used. So it’s best to benchmark it and choose the fastest combination. More here.
Let’s look at the major sections of this file one-by-one. Since the format is YAML, white-space, like spaces is important.
source_directories: The list of folders you actually want to back up. You can always add more source folders later. They will simply be added.repositories: The address of your backup repo.encryption_passphrase: The password to access the repo, as set in step 5.retention: Determines how many snapshots Borg will keep.
Once you are happy with the options, save the file and initialize your repository, like you would with Borg only:
-
$ borgmatic init --encryption repokey-blake2 -
$ borgmatic init --encryption repokey-blake2-chacha20-poly1305
Simply running borgmatic without any options will create a new backup. We will add the --verbosity option to see what’s going on during the first backup.
$ borgmatic --verbosity 2
Depending on your backup folder size, this may take a while. After Borgmatic is done, you can view the available snapshots and some statistics.
-
$ borgmatic rinfo -
$ borgmatic --list --info
After a few seconds you should get some output similar to this:
nyx2.local-2018-10-06T11:17:51       Sat, 2018-10-06 11:17:58 [6fa5db68d...aef3ea]
nyx2.local-2018-10-09T12:31:35       Tue, 2018-10-09 12:31:43 [6fa5db68d...aef3ea]
Repository ID: a59c22b17eeb4e9798...987d2f26873c
Location: ssh://mmvz9gp4@mmvz9gp4.repo.borgbase.com:repo
Encrypted: Yes (repokey)
Cache: /Users/manu/.cache/borg/a59c22b17eeb...d2f26873c
Security dir: /Users/manu/.config/borg/security/a59c22b17e...2f26873c
------------------------------------------------------------------------------
                       Original size      Compressed size    Deduplicated size
All archives:              134.41 GB             92.98 GB              7.17 GB

                       Unique chunks         Total chunks
Chunk index:                   25309               349526
You can see that there are 2 snapshots in this repository with a total of 134 GB of data. After compression the files were 92 GB and after deduplication only 7 GB. The reason for this difference is that every snapshot includes the same data, so there is a lot of potential for deduplication.
Step 7 – Put your Backups on Auto-Pilot
With Borgmatic working, we can set up Cron to do regular backups in the future. Cron is an old Unix tool to run repeated tasks. It’s usually included in all Unix-like systems.
$ crontab -e
This will open an editor to add new cron jobs. There are many ways to schedule cron-jobs. For hourly backups enter this:
@hourly borgmatic
This will run borgmatic every hour. You could also schedule it every 3 hours, always 10 minutes after the full hour:
10 */3 * * * borgmatic
When you’re done, save the file and you should be set. You can always make sure backups actually happen using the borgmatic rlist command or by setting a monitoring alert on BorgBase.com. It will alert you if no new snapshots are added for a set amount of time.
Conclusion
You now have a reliable and secure backup setup. Borg and Borgmatic offer many other options. As next steps you can:
- Export your repokey to keep it secure somewhere. It’s also possible to print it.
- Learn more about available compression options to see what works well with your data.
$ borg help compression - View all available Borgmatic options, like excluding certain files.
- Set up a local backup repository to backup to a hard drive or thumb drive. This is not a replacement for a cloud backup, but does provider some protection against failed hardware if the size of the data is too large to upload.